当ページのリンクには広告が含まれています。
✓目次
この記事の対象者
・ Visual Studio Codeを使っている人
・ Swagger EditorをVisual Studio Codeで使いたい人
導入手順
- まずはVisual Studio Codeをインストールしましょう。インストール方法は以下の記事を参照ください。
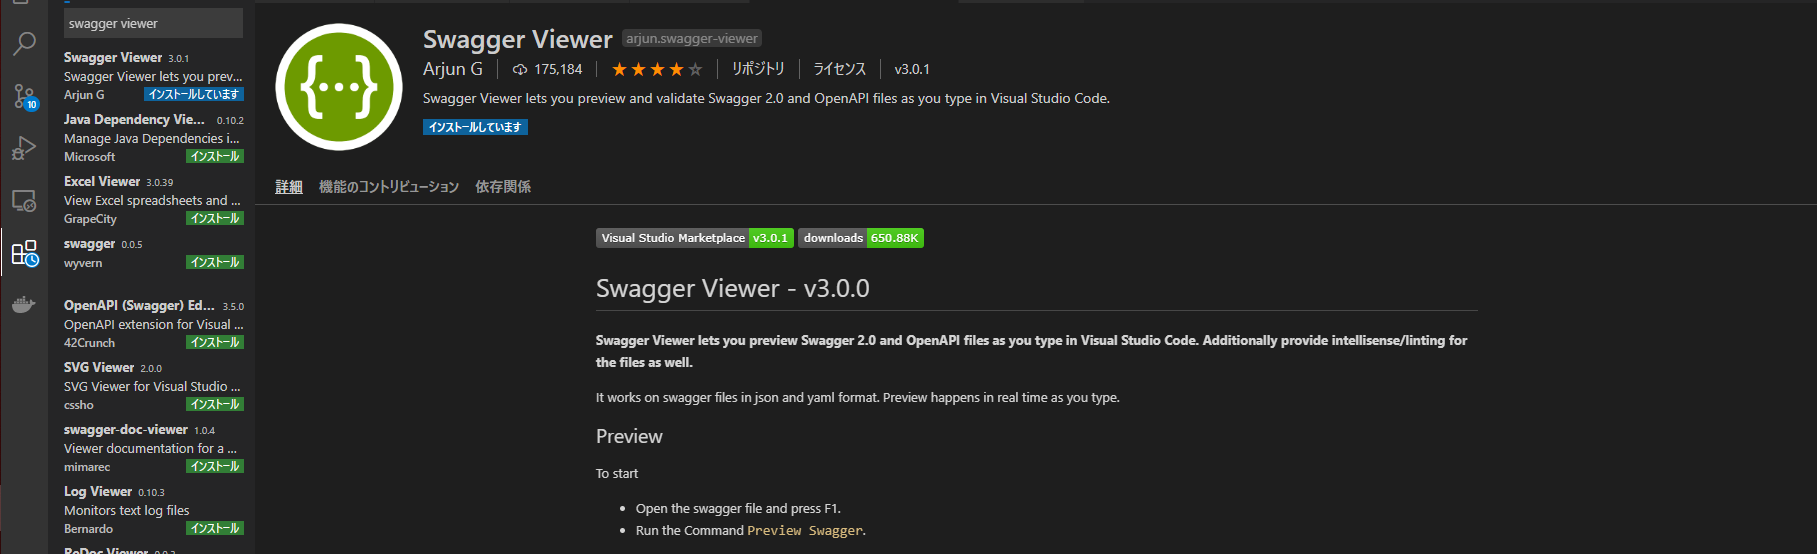
- Visual Studio Codeを起動し、左側の拡張機能をクリックし、”Swagger viewer”と検索窓に入力して検索しましょう。
- Swagger viewerが表れるので、インストールを実施。

- インストールが完了したら、Visual Studio Codeを再起動しましょう。これでインストール完了です。
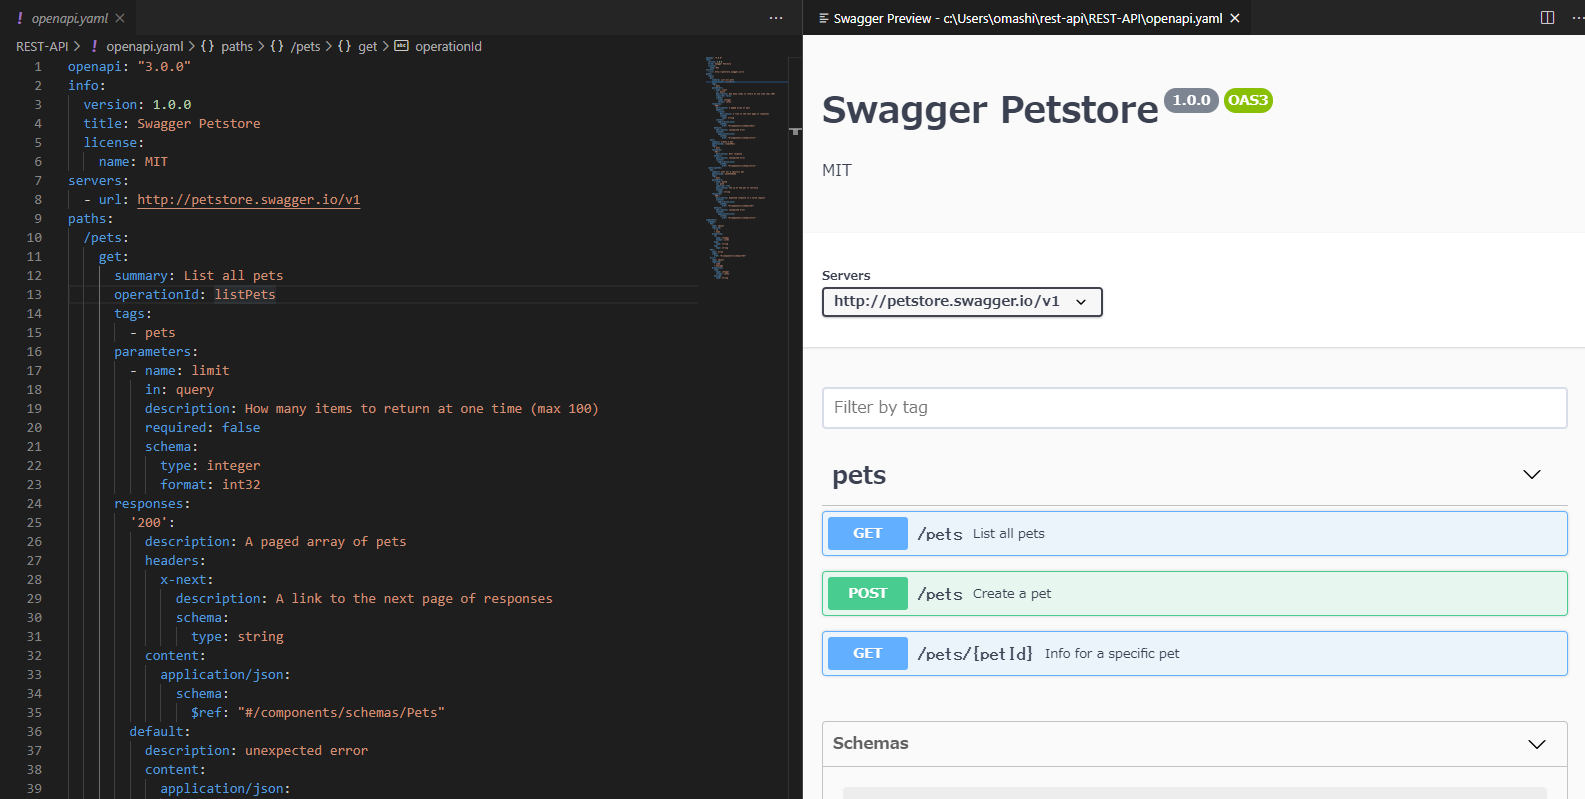
- Openapi specのサンプルをVisual Studio Codeに記述しましょう。Visual Studio Code上で新しいファイルを作成します。
openapi.yaml等任意のファイル名でOKです。
- 新規作成したyamlファイルに、以下の、Open API Spec v3.0のPetStore.yamlをコピペしてください。
1
2
3
4
5
6
7
8
9
10
11
12
13
14
15
16
17
18
19
20
21
22
23
24
25
26
27
28
29
30
31
32
33
34
35
36
37
38
39
40
41
42
43
44
45
46
47
48
49
50
51
52
53
54
55
56
57
58
59
60
61
62
63
64
65
66
67
68
69
70
71
72
73
74
75
76
77
78
79
80
81
82
83
84
85
86
87
88
89
90
91
92
93
94
95
96
97
98
99
100
101
102
103
104
105
106
107
108
109
110
111
| openapi: "3.0.0"
info:
version: 1.0.0
title: Swagger Petstore
license:
name: MIT
servers:
- url: http://petstore.swagger.io/v1
paths:
/pets:
get:
summary: List all pets
operationId: listPets
tags:
- pets
parameters:
- name: limit
in: query
description: How many items to return at one time (max 100)
required: false
schema:
type: integer
format: int32
responses:
'200':
description: A paged array of pets
headers:
x-next:
description: A link to the next page of responses
schema:
type: string
content:
application/json:
schema:
$ref: "#/components/schemas/Pets"
default:
description: unexpected error
content:
application/json:
schema:
$ref: "#/components/schemas/Error"
post:
summary: Create a pet
operationId: createPets
tags:
- pets
responses:
'201':
description: Null response
default:
description: unexpected error
content:
application/json:
schema:
$ref: "#/components/schemas/Error"
/pets/{petId}:
get:
summary: Info for a specific pet
operationId: showPetById
tags:
- pets
parameters:
- name: petId
in: path
required: true
description: The id of the pet to retrieve
schema:
type: string
responses:
'200':
description: Expected response to a valid request
content:
application/json:
schema:
$ref: "#/components/schemas/Pet"
default:
description: unexpected error
content:
application/json:
schema:
$ref: "#/components/schemas/Error"
components:
schemas:
Pet:
type: object
required:
- id
- name
properties:
id:
type: integer
format: int64
name:
type: string
tag:
type: string
Pets:
type: array
items:
$ref: "#/components/schemas/Pet"
Error:
type: object
required:
- code
- message
properties:
code:
type: integer
format: int32
message:
type: string
|
- 次にSwagger Viewerを起動します。Shift + Alt + Pの3つのキーを押下してください。
するとVisual Studio Codeの右側に、Swagger UIが表示されます。
Swaggerを使ったREST APIの設計方法について
Swaggerを用いてREST APIの設計書を作成する方法は、以下のUdemy講座を確認ください。30日以内であれば、無料(返金保証付き)です。
【視聴期限無し】UdemyでSwaggerを学ぶ【30日間返金保証付き】
関連書籍
リンク
関連記事
- Dockerを用いてSwagger Editorを動作させる方法もまとめています。
- REST APIを設計する際に気を付けるべき主なポイントを以下の記事にまとめています。