【M1 Mac】Railsの開発環境をdocker-composeで作成する

【M1 Mac】Railsの開発環境をdocker-composeで作成する

当ページのリンクには広告が含まれています。


M1 MacでもDockerでRails開発環境作れるの?という疑問に答えていきます!


目次


この記事の対象者:M1 Macにdocker-composeでRailsの環境を作りたい方


・ M1 MacでRails開発環境をDockerで構築したい方(Rails 6.0.3.4 / mySQL 8.0.22系)


WindowsのPCを用いている方は、以下の記事を参照してください。

>> 【Windows】DockerでRuby on Rails開発環境構築方法

M1 Macにdocker-composeを用いてRails環境をを構築する流れ


  • Docker Desktop for Macのインストール
  • Dockerfileの作成
  • Gemfileの作成
  • Gemfile.lockの作成
  • docker-compose.ymlの作成
  • MySQLの設定ファイルの作成の設定
  • Rails開発環境の構築

docker Desktop for Macのインストール


以下の記事にまとめられているインストール方法で問題なく導入できます。
Macbook Pro M1(Apple Silicon) で Dockerを動かす - Qiita


インストールが完了したらバージョンと動作確認。


terminal
1
2
3
4
5
$ docker --version
Docker version 20.10.1, build 831ebeae96

$ docker-compose --version
docker-compose version 1.27.4, build 40524192

Dockerfileの作成


まずは任意の空のディレクトリを用意して、Dockerfileを用意していきます。


この記事では``railsapp``という名前の空ディレクトリを作ります。


terminal
1
2
3
$ mkdir ~/railsapp
$ cd ~/railsapp
$ vim Dockerfile


docker-composeを使う場合、docker-compose.ymlがおいてあるディレクトリ名が、コンテナ名やvolume名の接頭字として使用されます。


実際の開発においては、プロジェクトの名前など、意味のあるディレクトリ名にしておいたほうが望ましいです。


また、作成したディレクトリをビルドコンテキストとするので、不要なファイルは含めないようにしましょう。


railsapp/Dockerfile
1
2
3
4
5
6
7
8
9
10
11
12
13
FROM ruby:3.0.0
RUN apt-get update -qq && apt-get install -y build-essential nodejs
RUN mkdir /app
WORKDIR /app
COPY Gemfile /app/Gemfile
COPY Gemfile.lock /app/Gemfile.lock
RUN bundle install
COPY . /app

RUN curl https://deb.nodesource.com/setup_12.x | bash
RUN curl https://dl.yarnpkg.com/debian/pubkey.gpg | apt-key add -
RUN echo "deb https://dl.yarnpkg.com/debian/ stable main" | tee /etc/apt/sources.list.d/yarn.list
RUN apt-get update && apt-get install -y nodejs yarn postgresql-client


Dockerfileは、Railsを実行するためのファイルサーバやパッケージをイメージに含めるための定義が書かれています。ポイントだけ説明します。

  • FROM ruby:3.0.0: 現時点で最新バージョンであるruby 3.0.0を指定しています。
  • COPY . /appはDockerファイルの置いてあるフォルダの内容をすべてコンテナ内の/appディレクトリにコピーしています。これはrailsのアプリケーション実行に必要なファイルをすべてコンテナの中に含めるために記載している。そのため余計なファイルを含めてしまうと、コンテナに含まれてしまうので、本記事で述べるファイル以外の関係のないファイルはおかないように注意しましょう。
  • 10行目〜13行目は、yarnというjsのパッケージ管理ツールをDockerコンテナ内部にインストールするためのコードです。後々、Webpackを導入するために必要となります。


Gemfileの作成


GemfileはインストールするGemを定義しておくためのファイルです。


railsapp/Gemfile
1
2
source 'https://rubygems.org'
gem 'rails', '6.0.3.4'


sourceには、Gemのダウンロード元のURLを記載しています。


インストールするGemには現時点で最新バージョンであるRailsの6.0.3.4を指定しています。


このGemfileが配置されたディレクトリで、「bundle install」コマンドを実行すると、インストールが実行されるよ!

Gemfile.lockの作成


terminal
1
$ vim Gemfile.lock


Gemfile.lockでは空のファイルになります。通常Gemfile.lockは、直接編集するものではありません。Gemfile.lockはbundle installを行った際に、実際にインストールしたGemのリストとバージョンが自動的に記載されるファイルです。


つまり、

1. Gemfileでinstallしたいgemを定義
2. bundle installコマンドを実行
3. gemがインストールされる
4. installしたgemがGemfile.lockに記載される

ということだね!


Gemfile.lockの用途は、別のサーバーや他の開発者のPCといった別環境で同じRailsアプリを動かす際、同じGemをインストールするために使用されます。


Gemをインストールする際は、インストールするGemを動かすために必要な別のGemも一緒にインストールしてくれます。


あるライブラリが別のライブラリを必要とすることを「依存関係」っていうんだ!


依存関係も含めて何がインストールされたのかが、全てGemfile.lockに記載されます。


このGemfile.lockを別の環境に持っていき、そこでbundle installコマンドを実行すると、Gemfile.lockに記載された内容に従って、Gemのインストールが実行される、というわけです。

docker-compose ymlの作成


docker-compose.ymlは、Dockerで複数のコンテナを設定に従ってまとめて起動するためのファイルです。
ここでは、Railsを実行するコンテナとMySQLを実行するコンテナを起動する定義を記載します。


railsapp/docker-compose.yml
1
2
3
4
5
6
7
8
9
10
11
12
13
14
15
16
17
18
19
20
21
22
version: '3'
services:
web:
build: .
command: bundle exec rails s -p 3000 -b '0.0.0.0'
volumes:
- .:/app
ports:
- 3000:3000
depends_on:
- db
tty: true
stdin_open: true
db:
image: mysql@sha256:dce31fcdd15aaedb5591aa89f19ec37cb79981af46511781fa41287d88ed0abd
volumes:
- db-volume:/var/lib/mysql
- ./mysql-confd:/etc/mysql/conf.d
environment:
MYSQL_ROOT_PASSWORD: password
volumes:
db-volume:


注目する点は、MySQLのimages指定です。
2021年1月時点ではタグではなくDIGESTの欄のIDを指定しないとエラーが出ます。

そして./mysql-confd:/etc/mysql/conf.dは、MySQLのデフォルトの認証形式であるcaching_sha2_passwordからmysql_native_passwordに変更するファイルになります。

この設定ファイルは次のセクションで作成します。

MySQLの設定ファイルの作成


MySQLのデフォルトの認証形式をデフォルトのcaching_sha2_passwordからmysql_native_passwordに変更するファイルは以下のとおりです。


railsapp/mysql-confd/default_authentication.cnf
1
2
[db]
default_authentication_plugin= mysql_native_password


[db]と書かれている部分は、docker-compose.ymlファイルに記載されたデータベースのservice名に対応しています。

Rails開発環境の構築


ここまで作成した設定ファイルを使用して、Railsの開発環境を動かしていきます。

フォルダとファイルは以下のとおりです。


tree
1
2
3
4
5
6
7
8
9
.
├── Dockerfile
├── Gemfile
├── Gemfile.lock
├── docker-compose.yml
└── mysql-confd
└── default_authentication.cnf

1 directory, 5 files


以下のコマンドを実行します。

terminal
1
$ docker-compose run web rails new . --force --database=mysql


ここでERROR: Service 'web' failed to build : The command '/bin/sh -c curl https://dl.yarnpkg.com/debian/pubkey.gpg | apt-key add -' returned a non-zero code: 2というエラーが発生しましたら、本記事の末尾のコメント欄に対応例が紹介されていますので、お手数ですがそちらをご確認ください。


処理が完了するとRailsプロジェクトのファイルが自動生成されます。


terminal
1
2
3
4
5
/railsapp $ ls
Dockerfile Rakefile config lib package.json test
Gemfile app config.ru log postcss.config.js tmp
Gemfile.lock babel.config.js db mysql-confd public vendor
README.md bin docker-compose.yml node_modules storage yarn.lock


ここでGemfileに追記されたGemのインストールや作成されたファイルをコンテナ内に取り込むために、もう一度ビルドを実行します。


terminal
1
$ docker-compose build


ビルドが完了したら、Railsで使用するデータベースの設定ファイルを編集します。
ファイルはconfigディレクトリ内にあるdatabase.ymlです。


変更箇所は17行目と18行目です。


database.yml
1
2
3
4
5
6
7
8
9
10
11
12
13
14
15
16
17
18
19
20
21
22
23
24
25
26
27
28
29
30
31
32
33
34
35
36
37
38
39
40
41
42
43
44
45
46
47
48
49
50
51
52
53
54
# MySQL. Versions 5.5.8 and up are supported.
#
# Install the MySQL driver
# gem install mysql2
#
# Ensure the MySQL gem is defined in your Gemfile
# gem 'mysql2'
#
# And be sure to use new-style password hashing:
# https://dev.mysql.com/doc/refman/5.7/en/password-hashing.html
#
default: &default
adapter: mysql2
encoding: utf8mb4
pool: <%= ENV.fetch("RAILS_MAX_THREADS") { 5 } %>
username: root
password: password # 変更
host: db # 変更

development:
<<: *default
database: app_development

# Warning: The database defined as "test" will be erased and
# re-generated from your development database when you run "rake".
# Do not set this db to the same as development or production.
test:
<<: *default
database: app_test

# As with config/credentials.yml, you never want to store sensitive information,
# like your database password, in your source code. If your source code is
# ever seen by anyone, they now have access to your database.
#
# Instead, provide the password as a unix environment variable when you boot
# the app. Read https://guides.rubyonrails.org/configuring.html#configuring-a-database
# for a full rundown on how to provide these environment variables in a
# production deployment.
#
# On Heroku and other platform providers, you may have a full connection URL
# available as an environment variable. For example:
#
# DATABASE_URL="mysql2://myuser:mypass@localhost/somedatabase"
#
# You can use this database configuration with:
#
# production:
# url: <%= ENV['DATABASE_URL'] %>
#
production:
<<: *default
database: app_production
username: app
password: <%= ENV['APP_DATABASE_PASSWORD'] %>


ファイルを保存して、以下のコマンドを実行します。


terminal
1
$ docker-compose up -d


webとdbの2つのコンテナが起動状態になっていることを確認します。両方ともStateがUPになっていればOKです。


terminal
1
2
3
4
5
$ docker-compose ps
Name Command State Ports
--------------------------------------------------------------------------------
railsapp_db_1 docker-entrypoint.sh mysqld Up 3306/tcp, 33060/tcp
railsapp_web_1 bundle exec rails s -p 300 ... Up 0.0.0.0:3000->3000/tcp


起動は完了しましたが、まだ開発環境用のデータベースが作成されていない状態なので、次のコマンドでデータベースを作成します。


terminal
1
$ docker-compose run web bundle exec rake db:create


これでうまく行けば良いですが、まれに以下のようなエラーが出てくるかと思います。


エラー
1
Mysql2::Error::ConnectionError: Plugin caching_sha2_password could not be loaded: /usr/lib/aarch64-linux-gnu/mariadb19/plugin/caching_sha2_password.so: cannot open shared object file: No such file or directory

localhost:3000


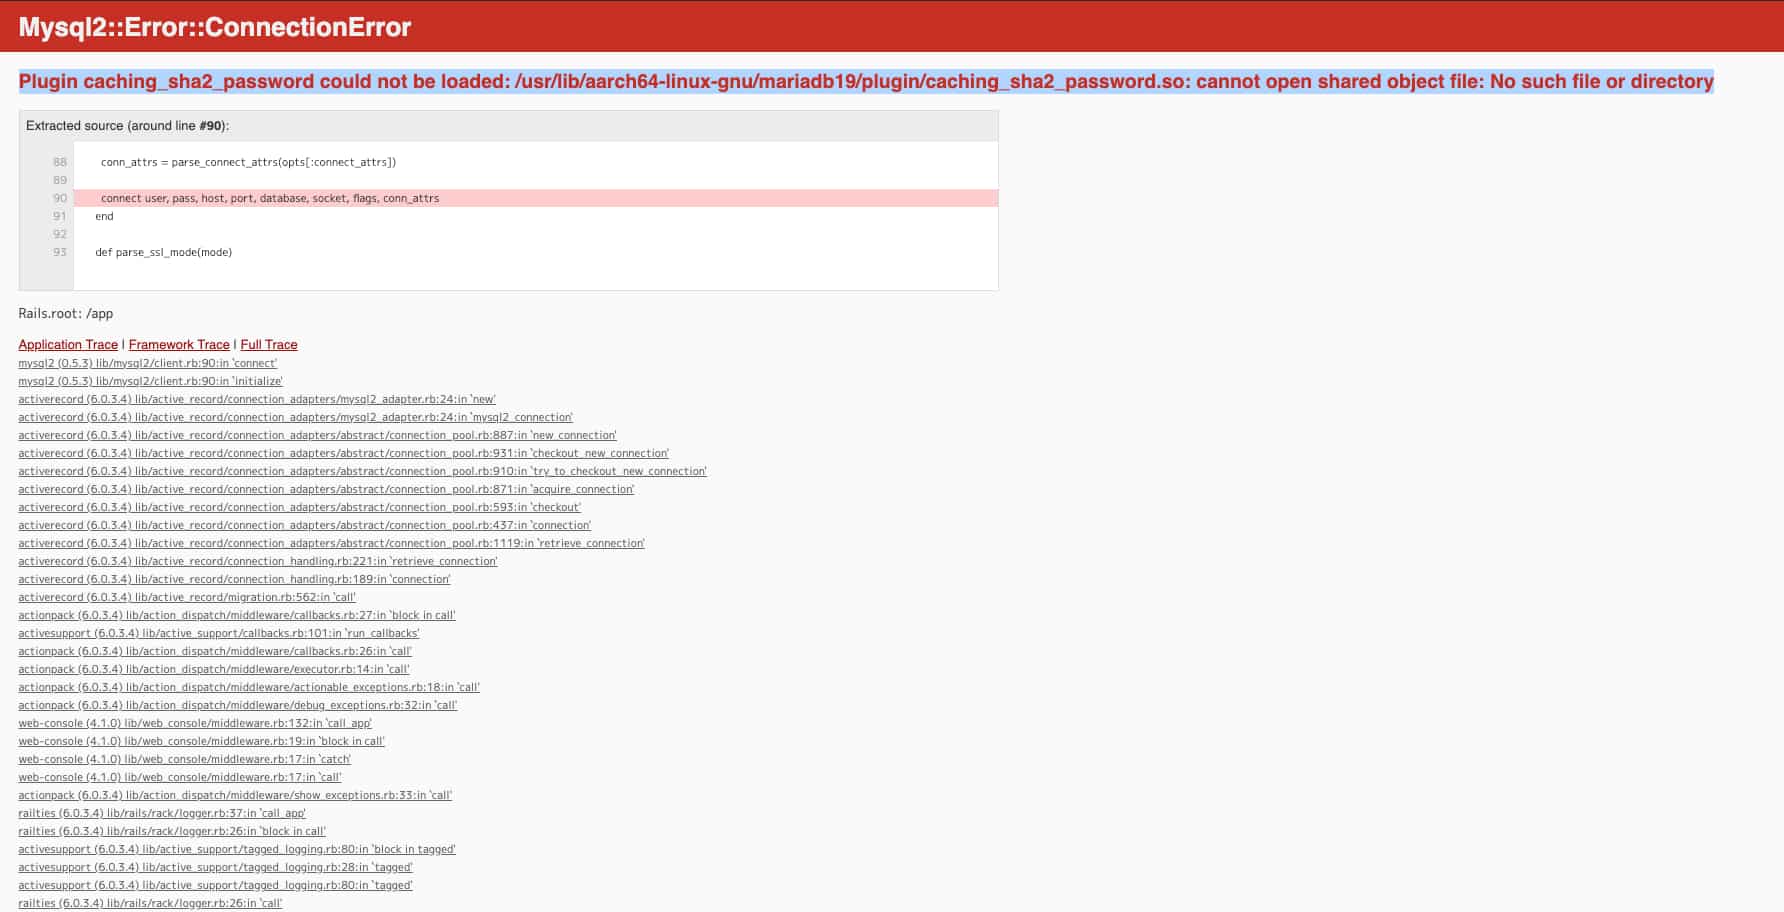
これは、MySQL 8.0系の認証形式がcaching_sha2_passwordのままになっているためです。


本来ならdefault_authentication.cnfが変えてくれるはずなんですけどね。。。


以下のように、MySQLにログインして2つのrootの認証方式をmysql_native_passwordに変更します。


terminal
1
2
3
4
5
6
7
8
9
10
11
12
13
14
15
16
17
18
19
20
21
22
23
24
25
26
27
28
29
30
31
32
33
34
35
36
37
38
39
40
41
42
43
44
45
46
47
48
49
50
51
52
$ docker exec -it ror_db_1 bash
root@a503c7951a1f:/# mysql -u root -p
Enter password:
Welcome to the MySQL monitor. Commands end with ; or \g.
Your MySQL connection id is 10
Server version: 8.0.22 MySQL Community Server - GPL

Copyright (c) 2000, 2020, Oracle and/or its affiliates. All rights reserved.

Oracle is a registered trademark of Oracle Corporation and/or its
affiliates. Other names may be trademarks of their respective
owners.

Type 'help;' or '\h' for help. Type '\c' to clear the current input statement.

mysql> SELECT User, Host, Plugin FROM mysql.user;
+------------------+-----------+-----------------------+
| User | Host | Plugin |
+------------------+-----------+-----------------------+
| root | % | caching_sha2_password |
| mysql.infoschema | localhost | caching_sha2_password |
| mysql.session | localhost | caching_sha2_password |
| mysql.sys | localhost | caching_sha2_password |
| root | localhost | caching_sha2_password |
+------------------+-----------+-----------------------+
5 rows in set (0.04 sec)

mysql> select @@version;
+-----------+
| @@version |
+-----------+
| 8.0.22 |
+-----------+
1 row in set (0.02 sec)

mysql> alter user 'root'@'%' identified WITH mysql_native_password by 'password';
Query OK, 0 rows affected (0.22 sec)

mysql> alter user 'root'@'localhost' identified WITH mysql_native_password by 'password';
Query OK, 0 rows affected (0.13 sec)

mysql> SELECT User, Host, Plugin FROM mysql.user;
+------------------+-----------+-----------------------+
| User | Host | Plugin |
+------------------+-----------+-----------------------+
| root | % | mysql_native_password |
| mysql.infoschema | localhost | caching_sha2_password |
| mysql.session | localhost | caching_sha2_password |
| mysql.sys | localhost | caching_sha2_password |
| root | localhost | mysql_native_password |
+------------------+-----------+-----------------------+
5 rows in set (0.01 sec)


これで再び以下のコマンドを実行してください。


terminal
1
2
3
4
$ docker-compose run web bundle exec rake db:create
Creating ror_web_run ... done
Created database 'app_development'
Created database 'app_test'


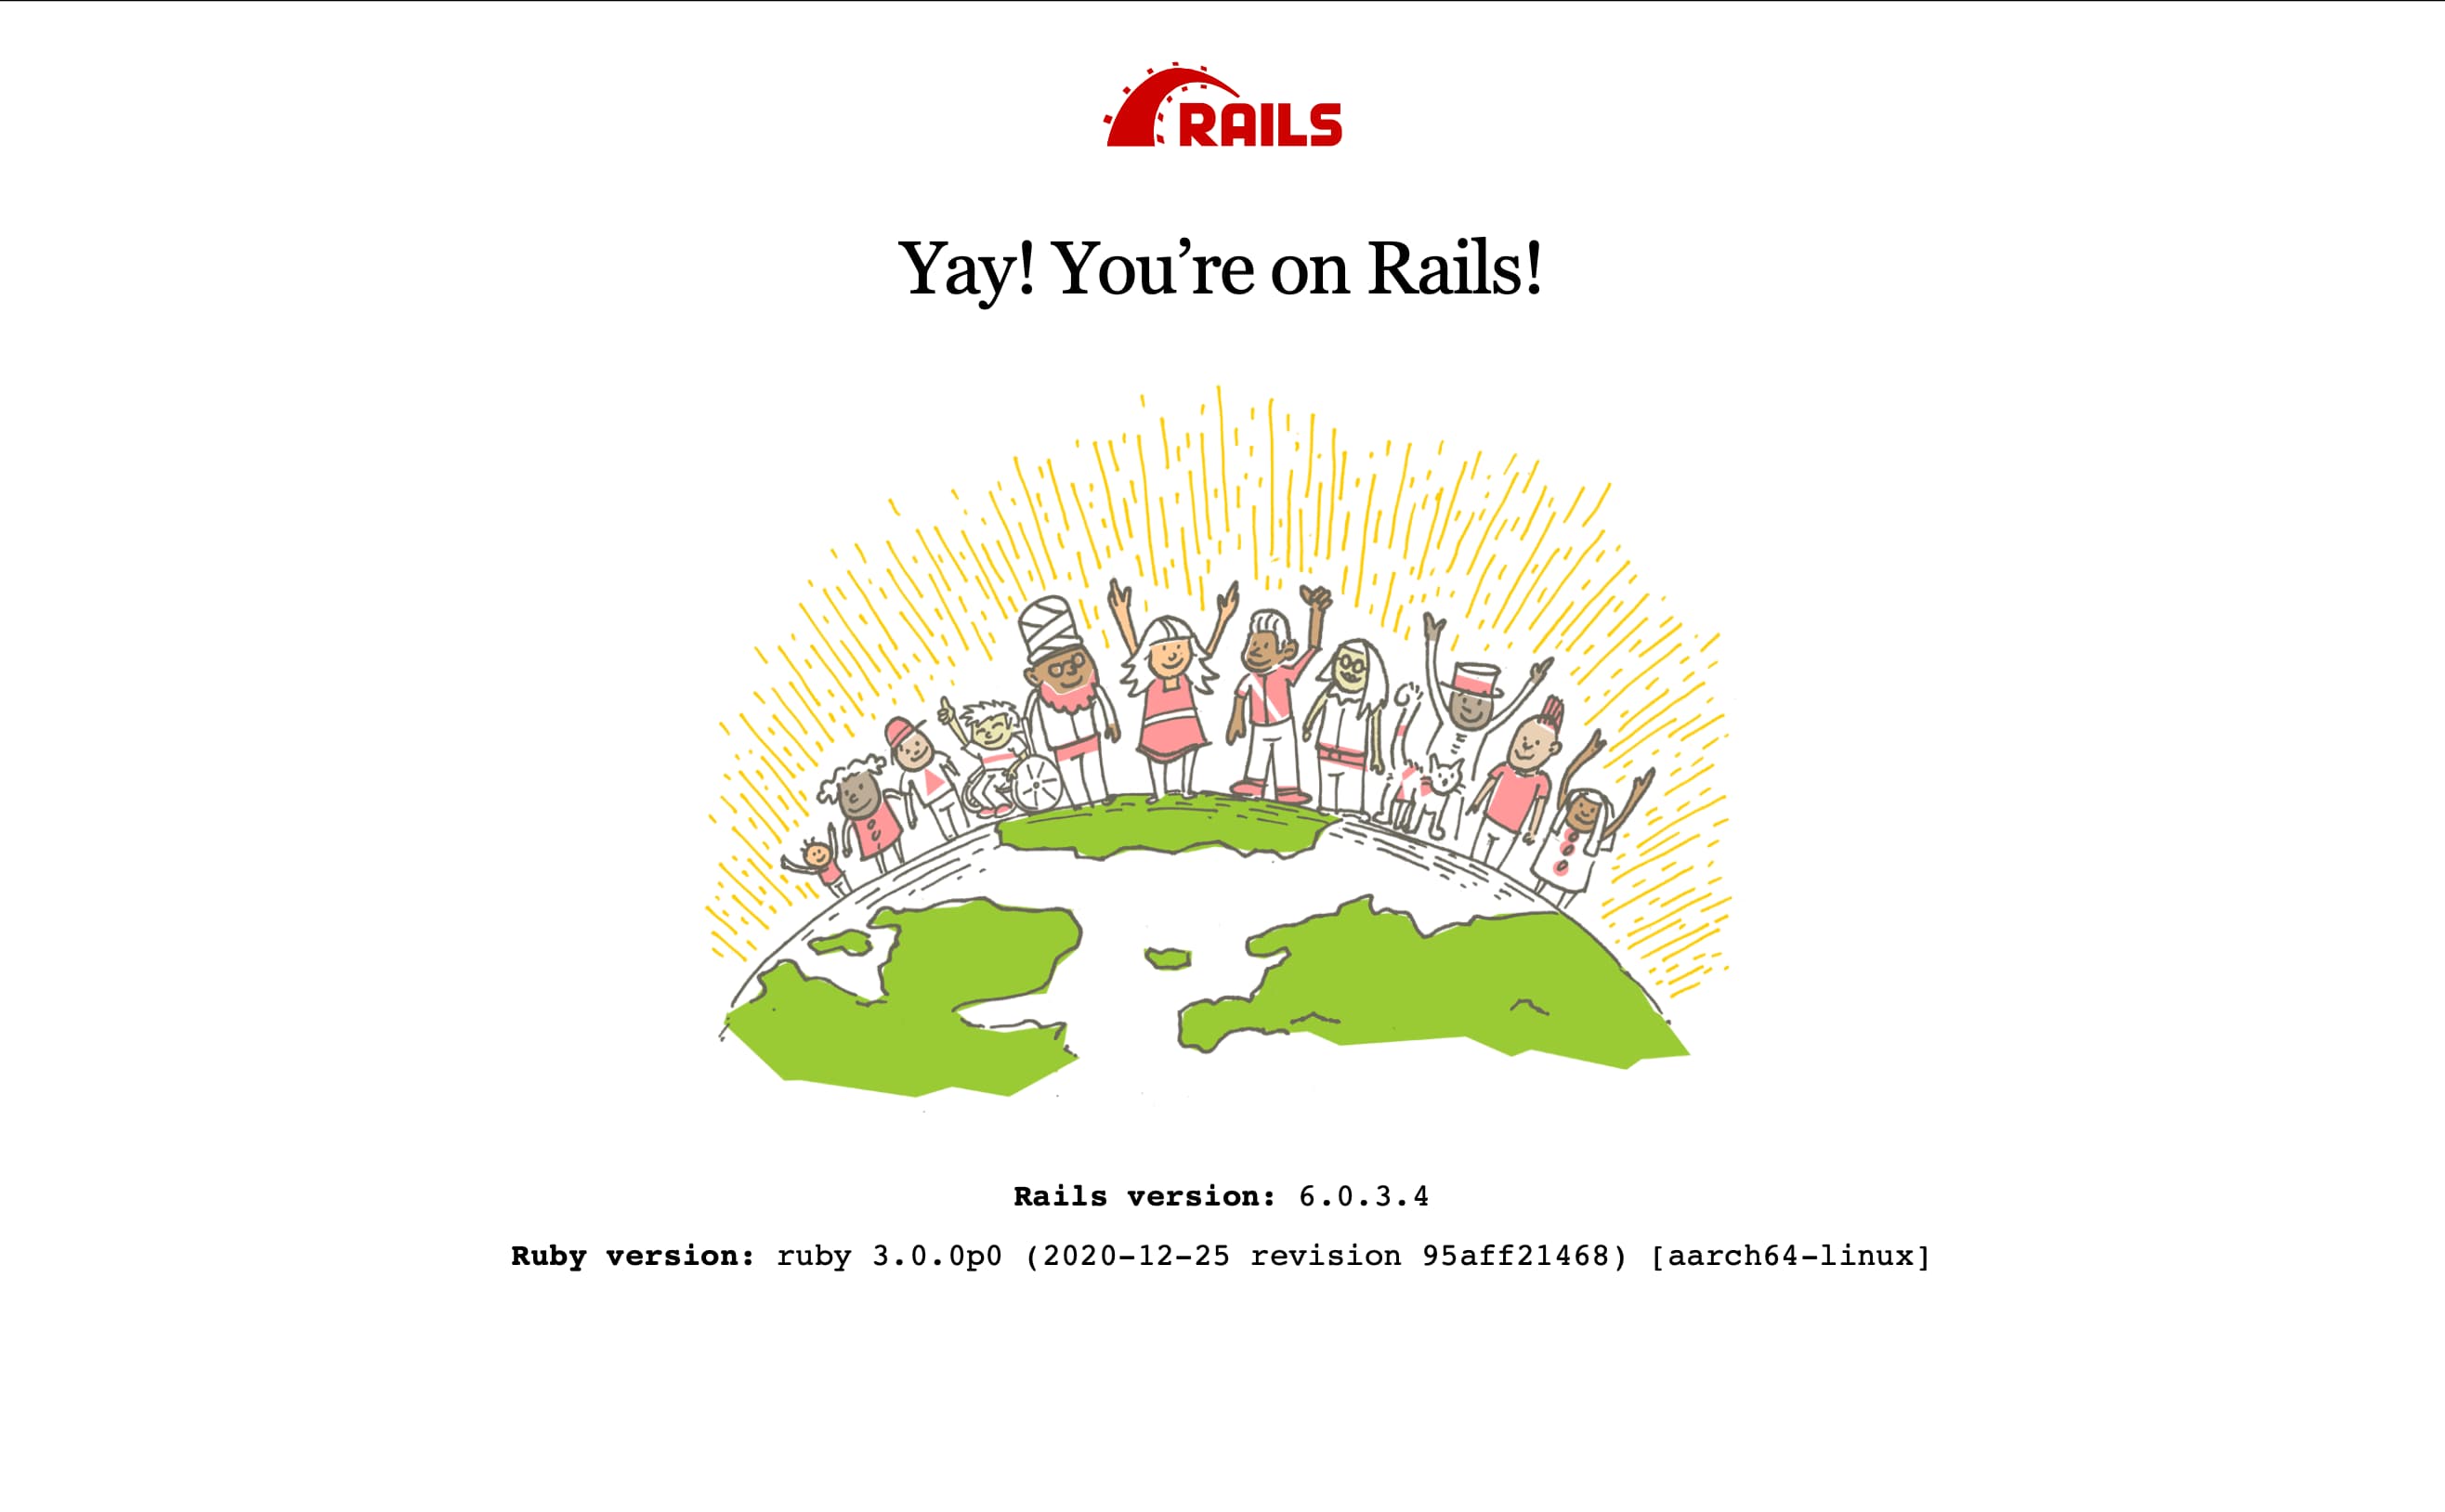
localhost:3000にブラウザでアクセスするとRailsの画面が現れます。


localhost:3000にアクセスした様子


まとめ:M1 Macにdocker-composeを用いてRailsの環境を構築する方法をまとめました。

お疲れさまでした。これでRailsの環境構築は完了です。

これからRailsの知識を着けたい方は、デイトラのRailsコースがおすすめですので、合わせてご確認ください。

教材を元に作成したサンプルアプリを改造しながらオリジナルアプリを作るのが、プログラミングスキルを向上させるコツです。

頑張ってください。

もしよろしければ、以下の記事もご確認ください。

>> 【厳選4つ】未経験におすすめのプログラミングスクール・教材! - omathin blog

参考記事

コメント